
|
|||
|
more plans at HEATAL.COM 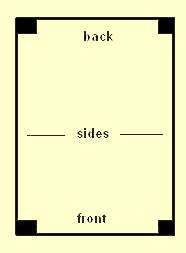
 free plans for a warm dog
Building the dog house plan requires basic tools. The free dog house plan, pets enclosure plan and dog house heater are easy to read. Building a dogs home plan. If the plans are followed correctly the finished results will be an attractive shelter fitted with a pet heater 

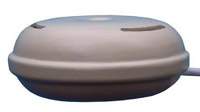
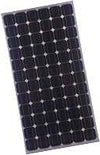
Solar Heater for Pet Homes and half price 
The heated dog house plan is an adaptable building plan. Modifications can be carried out at any time during the dog house construction. The plans are easy to alter. Plans for a dog house with heatingThere is a list of components used for the construction of the small dog house.Lists of dog house panels show the numbered edges of panels and the position fitted HOW TO BUILD YOUR PET A HEATED DOGHOUSETo construct the heated dogshouse plan start with the predetermined size ofthe dogs house base and modify to suit all the following dog house panels. Your dog should be able to turn and stand inside the doghouse without brushing any panels. Measurements should be kept to the smallest size for the pets movements inside the doghouse. This reduces the cost of warming a doghouse. Building a dog house to warm pets
 A1/A2 Are equal measurements but larger than A5/A6 by approximately
20%
A1/A2 Are equal measurements but larger than A5/A6 by approximately
20%A3/A4 Are equal measurements but larger than A7/A8 by approximately 40% A5/A6 Are equal measurements to A7/A8 A7/A8 Are equal measurements to A5/A6 Base measurements of your heated doghouserunning in one direction. If the surface of the dog house is having a varnish to feature the wood grain, ensure panels for the dogshouse are cut with the grain in one direction. When matching grains plywood wastage can be considerable when cutting panels to match wood grain. 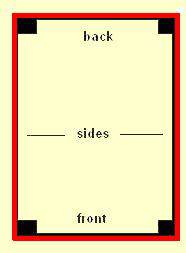
apply them to the base of the doghouse. This is center piece and reference point to the remaining measurements for construction

is an easy choir with the selection of dog house heaters that are available on our web site. There are pet heated beds, dog house warmer and fan heaters that are weatherproof plus many more heaters designed to warm pets 

Dogs home plan and heatingTHE SIDES FOR THE DOG HOUSE WILL BE THE FOLLOWING B1/B5 .. B2/B6 .. B3/B8 .. B4/B7 Equal measurements. These measurements are for the sides for the doghouse. 
Cut out the first side B1/B2/B3/B4 of the dogs home and use this side as a template to make the second side B5/B6/B7/B8. If the surface of the plywood you are using is different on either side make sure that the template pattern is marked on the same sides. This will ensure a uniform finish to the painted surfaces of the dog home when you construct the panels. C1/C2 Equal to A5 and add on twice the thickness of the plywood being used for the side on to the overall panel. C3/C4 Equal measurements to B1/B5 C5/C6 Equal measurements to A5 plus add on twice the thickness of the plywood being used for the doghouse side.  C7/C8 Equal measurements to B2/B6
A1+A2 are the ends of the doghouse roof A3+A4 are the sides of the doghouse roof A5+A6 are the ends of the dogs home base still available at partner sites 
 A7+A8 are the sides of the dog house base
B1+B2 are the ends of the doghouse side1 B3+B4 are the sides of the dogs house side1 B5+B6 are the ends of the doghouse side2 B7+B8 are the sides of the doghouses side2 C1+C2 are the ends of the dog house back C3+C4 are the sides of the doghouse back C5+C6 are the ends of the dogshouse front C7+C8 are the sides of the dogs house front heated pets home plan
The materials that are used to construct the
doghouse will be decided by the budget that is available to build the dogs
home.
Heavier plywood panels will increase the insulation properties of the dog
house.
This will reduce the heating cost of the pet heater fitted to the pets
home.

 Plywood panels selected for your dog house should not be an exterior plywood that
has been treated with chemicals that are poisonous to pets. Select framing timber
that is approx. one inch square ( 25 millimeters ) and suitable for the
construction you intend to use. (ie screwed glued or nailed to prevent timbers
from splitting) Timber will be required to line the inside of the base, sides and
doghouse corners. Timber will also be used for guides to re position the roof and
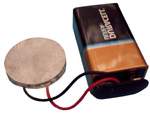
heater. Solar pet heater
Plywood panels selected for your dog house should not be an exterior plywood that
has been treated with chemicals that are poisonous to pets. Select framing timber
that is approx. one inch square ( 25 millimeters ) and suitable for the
construction you intend to use. (ie screwed glued or nailed to prevent timbers
from splitting) Timber will be required to line the inside of the base, sides and
doghouse corners. Timber will also be used for guides to re position the roof and
heater. Solar pet heater
BUILDING A DOGS HOUSEGalvanized nails and screws are items required for construction of the dogshouse and pets home. The doghouse will be exposed to the weather so all fixing screws and nails will need to be galvanized or zinc coated to prevent them from rusting. Construction grade glue is ideal for this form of building. Paint that contains lead or zinc should not be used for the small pets home. Painted surfaces release fumes so a curing period will be required after painting the new dog house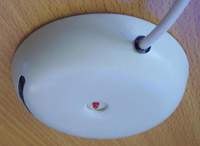

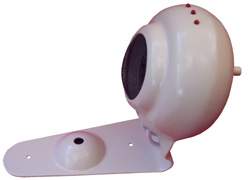
Planning & building dogshousesBuilding a dogshouse with metal fittings can be a hazard for your pet. If galvanized or zinc mesh wire is to be used as the front or on a window of the dogs house select mesh wiring that has been electroplated with a galvanized or zinc coating. The majority of manufactured mesh wiring has been dipped in a galvanizing bath. Your pet may be poisoned if the wire mesh is chewedDOG HOUSE HEATER The first part of the dog house
built is a doghouse base
The first part of the dog house
built is a doghouse base
Line the interior borders of the dog house with the timber. Remove a section of timber that is the same width as the door opening. The opening of the dog home can be to the center or side of the pets home. A dog house heater that is placed away from a fixed opening operates with more efficiency & reduce bills Assemble the sides to the dogshouse base using galvanized nails/glue or screws. Keep the plywood's side flush with the doghouse base. Position the upright corner pieces of the timber framing to the side edges. < < 50% off ENDING SOON Fit the back of the dogs home. Plywood backs must sit flush to the outside of both plywood sides and flush to the base underside. Fitting a dog house heaterthe dog house frame from splitting Dog house planFIT THE FRONT EDGE FLUSH WITH THE SIDES OF THE DOG HOUSE AND BASE UNDER SIDEPlace the roof of the dogs home in a position that is suitable for the enclosure and then fit the roof guides to the underside Timber left over from building can be used as frames beneath the floor of the dog house. When you are happy with the structural strength of the doghouse sand back rough areas of the dogs home and paint. Don't forget to install our heater
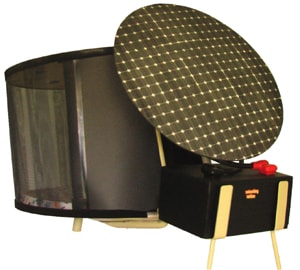
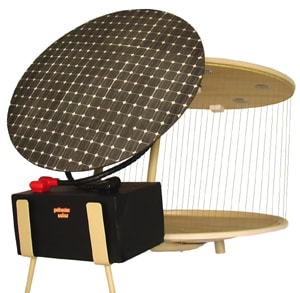
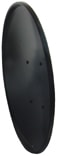
Solar heated dog house built from a discarded satellite dish If you have an obsolete satellite dish it can be easily converted into a warm and comfortable dog house. The dog house plan for building your pets home requires basic tools and no special skills. We start the dog house by converting the base ( satellite dish ) into a comfortable pets home. 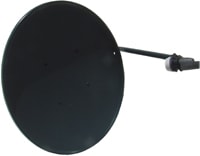
Dog houses should always be raised from contact with the ground to stop damp and mildew entering your pets home. The dog house plan require a minimum of three rubber support posts that provides a stable platform and insulates base from damp. Wood runners can also be used for supports. 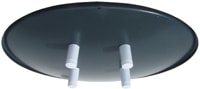 ( only use a dish that is your property*)
 The feet or support legs of the dog house are rubber stoppers.
These are available at most large do it yourself stores. 
Screws fixtures are often included with the door stopper. TO FIT THE DOG HOUSE SUPPORT LEGS simply locate the center of the dish ( dog house base ) and use this position for spacing of the dog house base supports into equal quarter sections for stability. Use a piece of string with some form of marking pen that is opposite in color to the dog house base (dish) tied to one end. Hold the opposite end of the string at the center position previously marked and draw a complete circle around the perimeter of the dog house base (dish) at a distance from the center that the feet will be located Spacing between the legs can be accurately measured by using the same piece of string and marker. Step out the spaces by adjusting the string length until equal spacing for the dog house supports is obtained. Screws or fixtures used to hold the support legs to the dish must not have the sharp end exposed inside the dish. Self tapping screws must be driven into the rubber legs with the screw head flush inside the dog house base surface. Dome headed screws and nuts can be used as an alternative to self tapping screws. The domes positioned on the inside must be set flush to the dog house surface. This will prevent an uncomfortable bulge protruding where your pet rests. 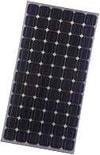
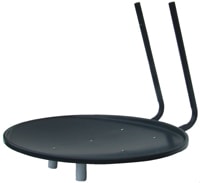
 Select a height for your dog house roof that provides sufficient space for your pet to enter into the
dog house. Do not make the space large as this will create an environment that allows the body
heat of your pet to escape in cold weather. Insulation built in the dog house and a removable
dog house back will provide adequate ventilation and protect your pet from hot weather.
Select a height for your dog house roof that provides sufficient space for your pet to enter into the
dog house. Do not make the space large as this will create an environment that allows the body
heat of your pet to escape in cold weather. Insulation built in the dog house and a removable
dog house back will provide adequate ventilation and protect your pet from hot weather.
The roof supports for the dog house must be constructed from material that provides adequate support for the dog house roofs weight and prevent movement in the wind. Ensure fixtures used to mount the roof supports onto the dog house base are flush.  your new solar heated dog house is weather proof
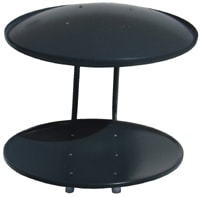
Cleaning and maintenance of the dog house is also simplified. This will protect pets that have a tendency to chew objects. The string and marker attached can be used to determine the correct measurements for the dog house wall. Mark a spot on the dog house base where the wall commences. Hold one end of the string against this position and carefully lay out the remaining sting around the perimeter of the dish up to the point where you require the dog house wall to end. Transfer this length on to the dog house wall then mark the height of the wall that is suitable for your dog house design. Cut out the dog house wall to these measurements. Shape the dog house wall to suit the circumference of the dish. This can be achieved by using a flexible plywood ( approximately three ply ) or molding a heavier plywood with the use of water and pressure. When the desired shape is obtained dress the entire dog house wall with a fine sand paper and select a suitable finish that complements your dog house appearance. ( No lead paints ) Position the finished wall to the inside of the dog house roof supports and fasten with counter sunk fittings to create a smooth and comfortable surface for your pet to rest against. Solar dog house heating details are available in the video. 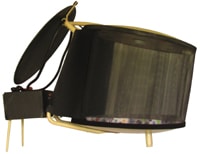


Complete solar pet homes are available from affiliate sites © Copyright dog house plans heating a dog house build a doghouse To build and heat a dogs home and small pets enclosure the materials you use will be the deciding factor on the useful life of the dog house. The use of any material that has been coated or treated with any chemicals that may be toxic to your pet should be avoided.Pets cannot be constantly supervised and it is not unusual for them to chew on their enclosures and resting areas. Pet heaters that are used to warm the dogs house and all other appliances that have an electrical supply to the pets home must have all electrical leads positioned in a safe and dry area. When constructing a heated doghouse plan, heated kennel, small pets enclosure or heated dogs home organize the positioning of the pets home and all electrical leads and connections before commencing construction the the heated dogshouse. Any doghouse you build should not have the enclosures floor resting on the ground. Resting the dog house in direct contact with the ground can create mildew and make the dogshouse cold and damp. Rodent control will also be difficult. Face the opening away from any prevailing winds. When using tools be sure the proper safety equipment and safety procedures are used at all times. Read and understand all instruction books that are supplied with any tools and always maintain a clean and safe working area. Never work around children or unrestrained pets or let them in the work area unsupervised. The free dog house plans and free kennel plans supplied are for personal use only and have all been built and tested for strength and operation and to my knowledge they are correct and accurate. The plans are supplied without warranties and guarantee and you acknowledge that you use them and operate all tools and equipment at your sole risk. The choice of dog house plan, pet heater or any other building plans for small pets found on this web site and the suitability for the chosen project is entirely your responsibility. You agree to indemnify petheaters from any claims, damages, personal injuries and expenses in regards to any building projects and plans found on this web site. * You can contact your satellite/cable provider to establish the legal owner of any dish being used to construct the dog house. PetHeaters keeping pets warm since 1998 NO PTFE PRODUCTS ARE USED IN OUR HEATERS (( home page )) 
|
|||

